Using SolidSync Network/Bluetooth GPS
- See the current location information in a simple display.
- Make GPS data available to any other device that can receive GPS data over a Bluetooth serial connection.
- Make the GPS data available to any other device that can receive GPS data over a TCP/IP network connection, and manage connected clients.
- Configurable update intervals.
- Can run in the background.
- Replay GPS information recorded using SolidSync Trip Tracker.
- Tested with applications including ESRI’s ArcGIS, Wireless InSSIDer, and others.
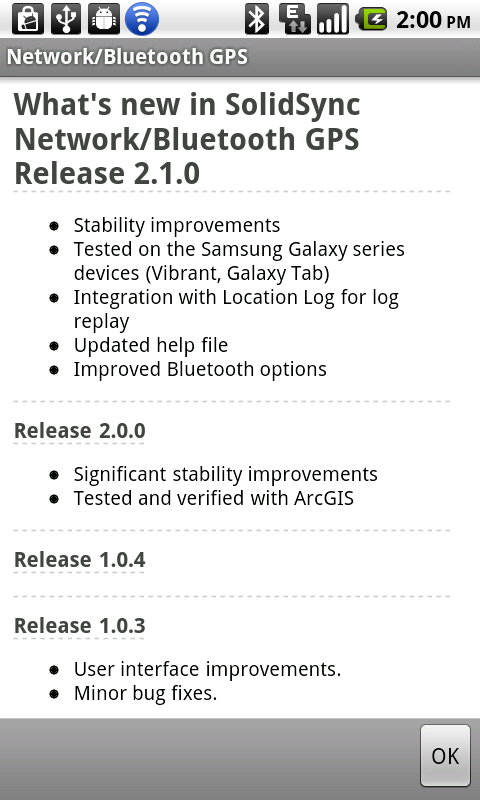
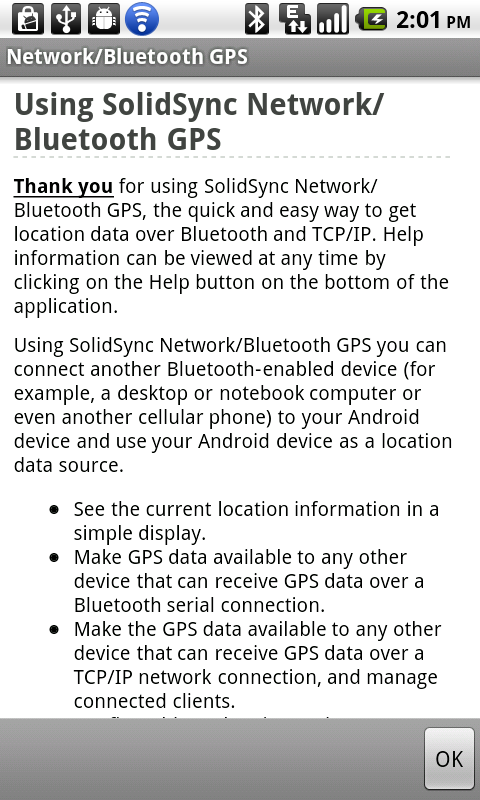
Tap the OK button to show the application help screen, as shown in Figure 2 below. This will be automatically shown the first time the application is started.
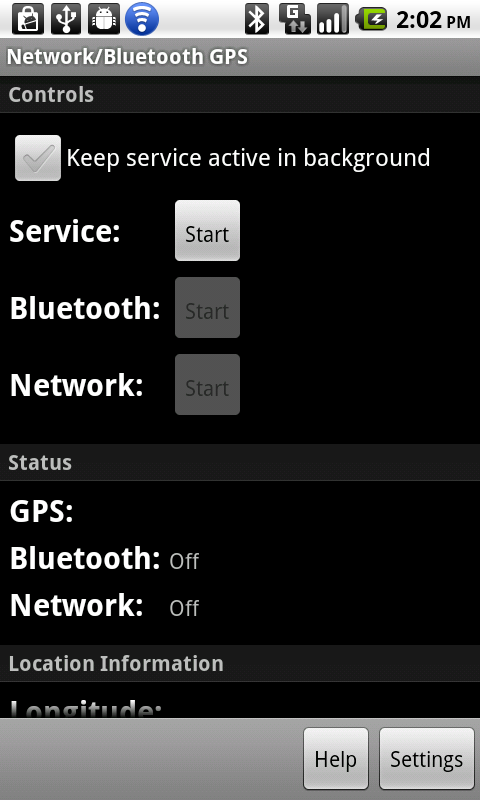
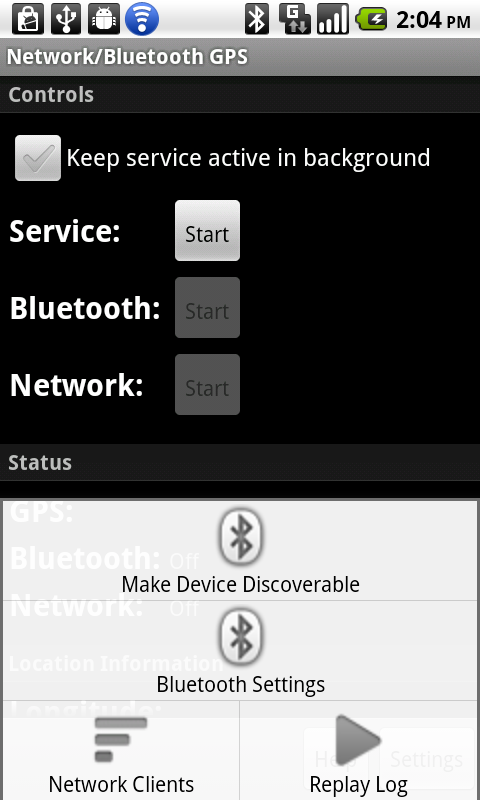
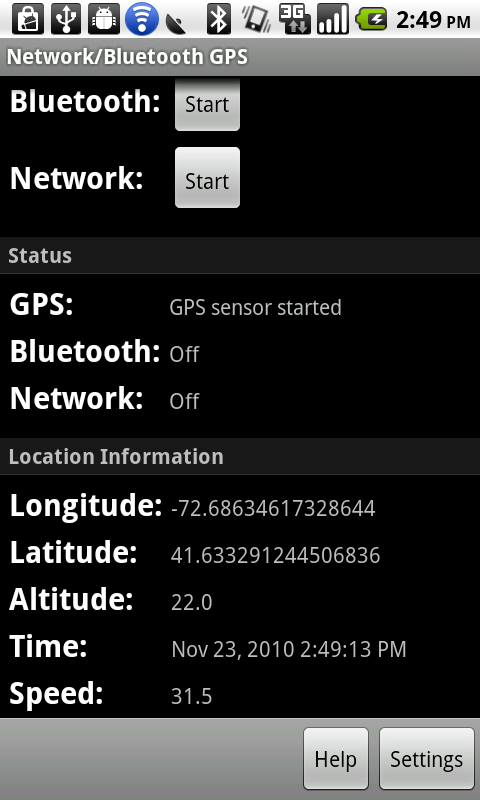
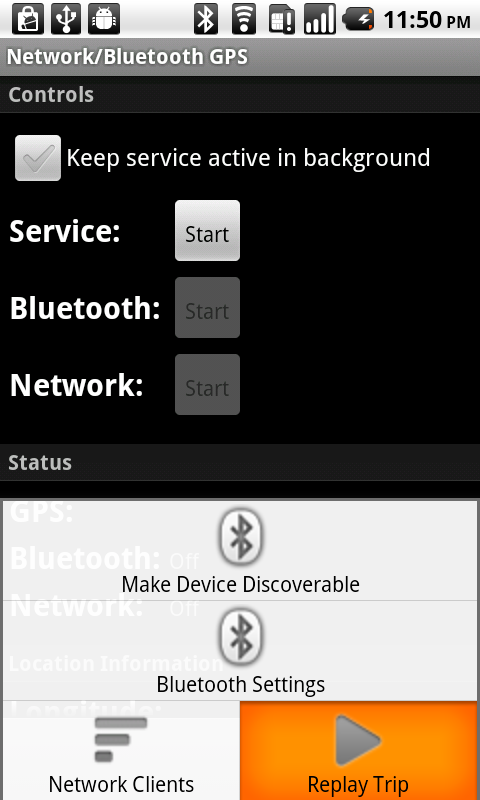
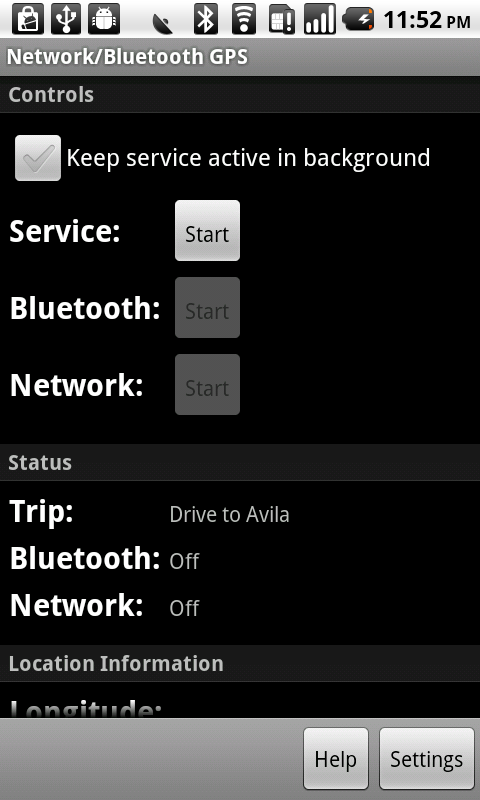
Tap the OK button to show the main application screen as in Figure 3 below: it includes service control buttons, status indicators and location details.
You can tap the Help button to show the help screen (Figure 2 above) at any time.
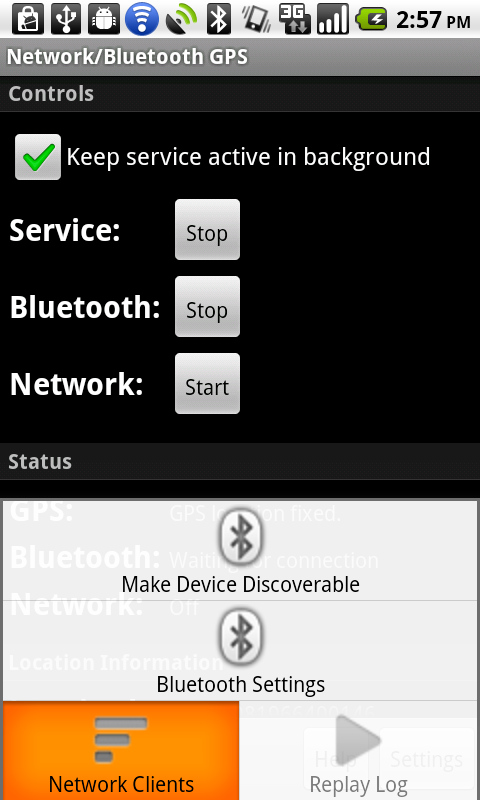
Tapping the Menu key will show the control menu as in Figure 4 below.
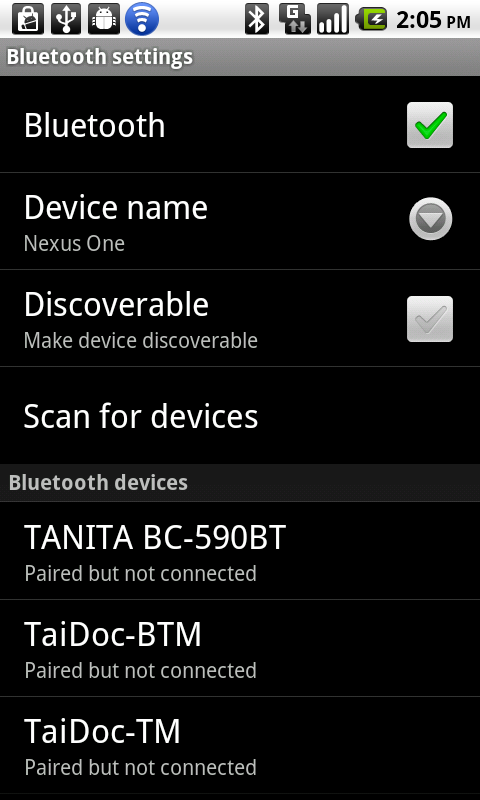
Ensure that Bluetooth option is checked (indicating that Bluetooth is enabled), then select Scan for devices and when the other device shows up tap and hold to bring up the Pair menu. You will need to complete the pairing process on your client device: the method to complete the pairing will vary based on the client device.
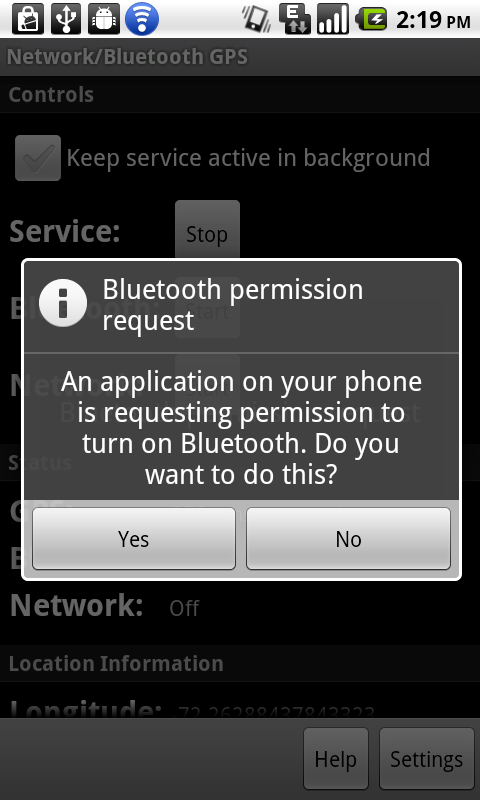
To request that your Android device be made discoverable by other Bluetooth devices, select the Make Device Discoverable menu option as shown in Figure 4 above. You will be prompted as shown in Figure 6 below.
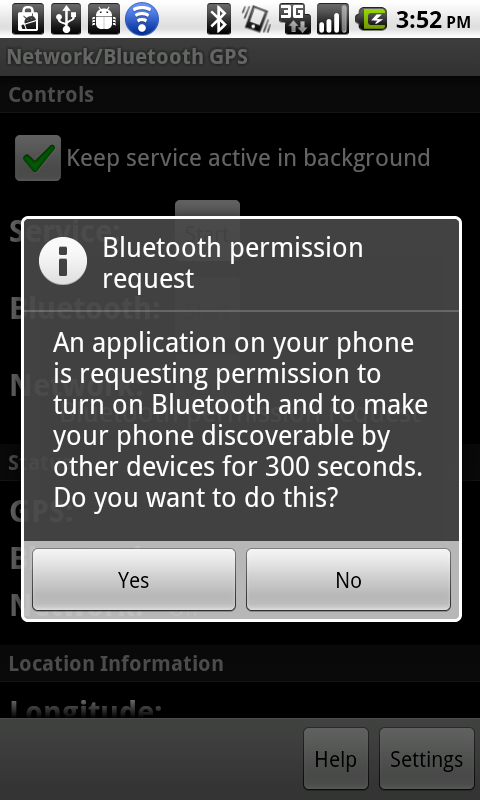
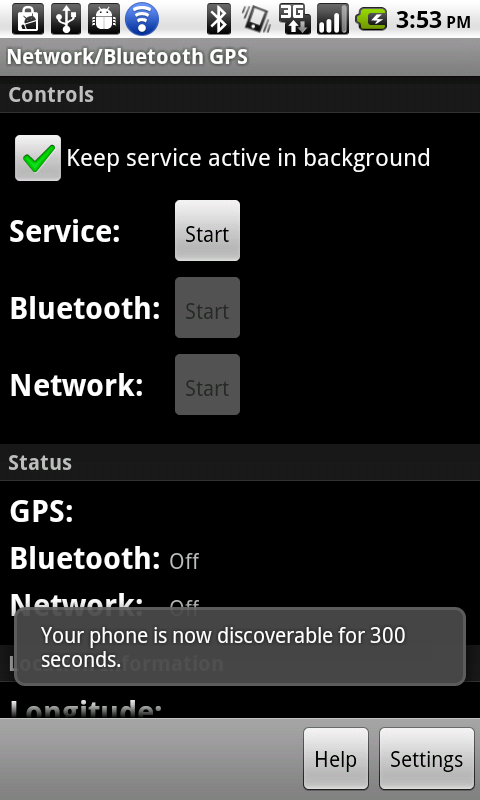
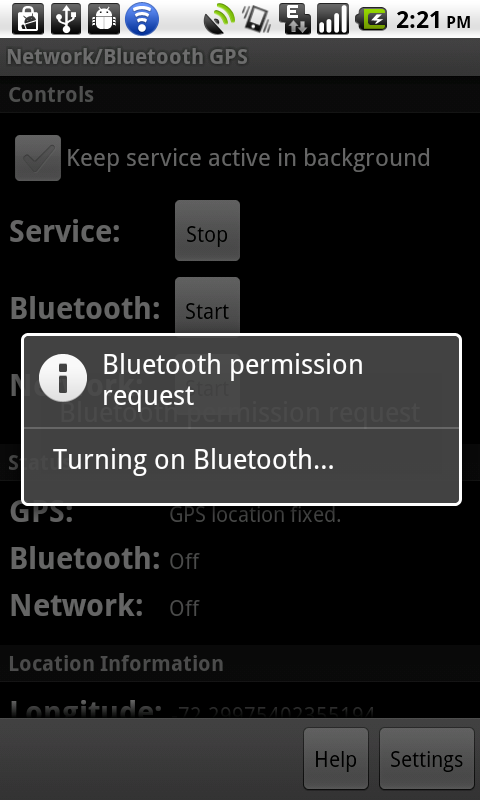
If you select , then a notification will be shown as in Figure 7 below.
Once the pairing is complete, press the button to return to the main application screen.
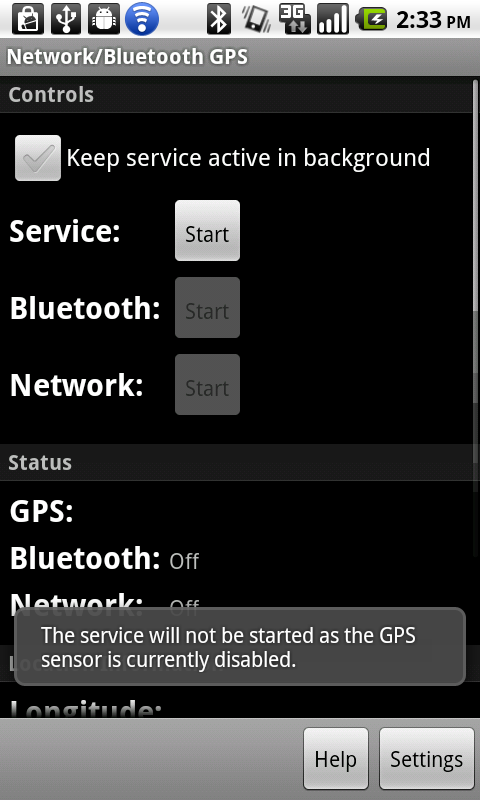
Ensure the GPS sensor is enabled by checking the appropriate item as shown in Figure 9 below.
Tap the button to return to the main application screen. If you do not enable the GPS sensor, the service will not be started and an error message will be shown as in Figure 10 below.
If the GPS sensor is enabled the service will then start as shown in Figure 11 below.
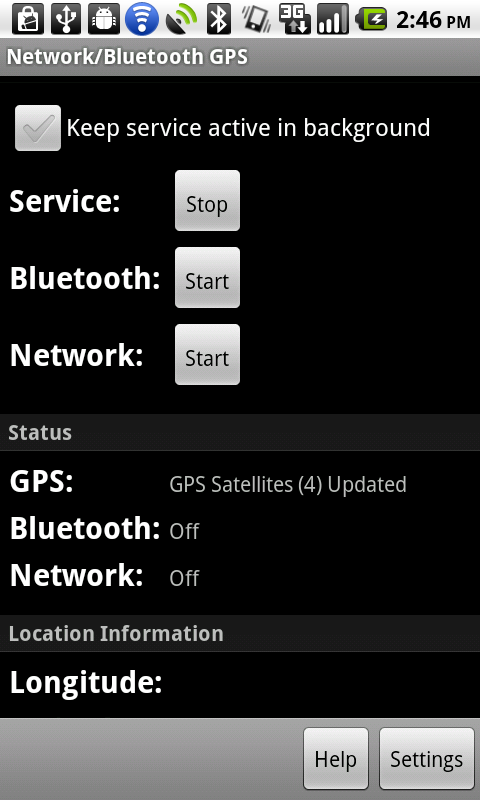
Once the GPS service has started, feedback about the quality of the reception of GPS satellites will be shown in the status section of the display as seen in Figure 11 above.
Once a GPS fix is achieved, the location information will be shown as in Figure 12 below (you may need to scroll down).
The Bluetooth functionality can be activated by clicking on the Bluetooth start button. If the Bluetooth system is not enabled, a prompt will appear (as shown in Figure 13 below).
If you select , then the Bluetooth will be activated as shown in Figure 14 below.
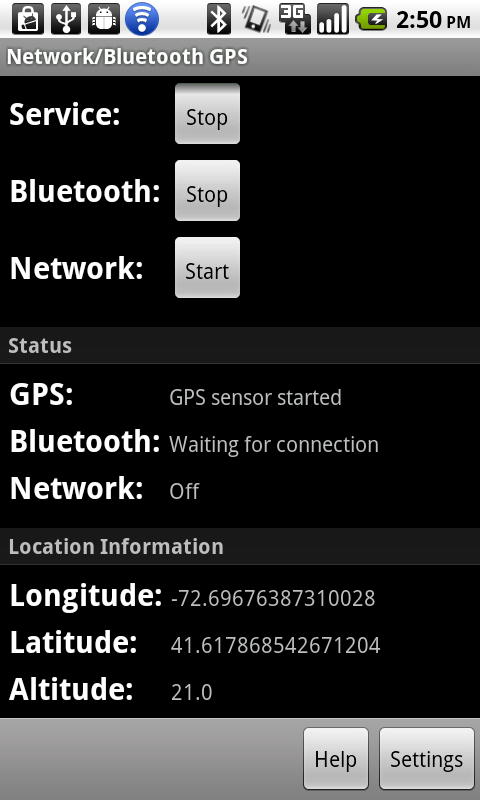
After the Bluetooth system is running, a Bluetooth serial port will be created and the NMEA (National Maritime Electronics Association) GPS outputs received from the Android GPS system will be relayed over this serial port. The status label will indicate that the Bluetooth service is waiting for a connection as shown in Figure 15 below.
A connection can then be made to this serial port from another device (such as a notebook computer or a Bluetooth-enabled PDA) to receive the GPS data. Note that with many laptop/desktop Bluetooth implementations there is a delay after disconnecting from a Bluetooth serial port before another connection to the same Bluetooth serial port can be made.
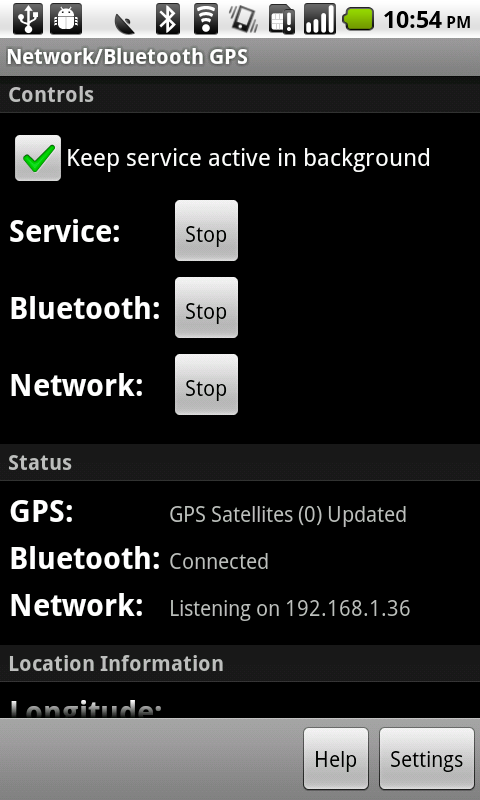
Similarly, the network functionality can be activated by clicking on the Network start button. When the network system is started a TCP/IP network server will be started on port 25010 and the NMEA (National Maritime Electronics Association) GPS outputs received from the Android GPS system will be relayed to all network clients. The status label will indicate that the network service is listening on the specific IP address as shown in Figure 16 below.

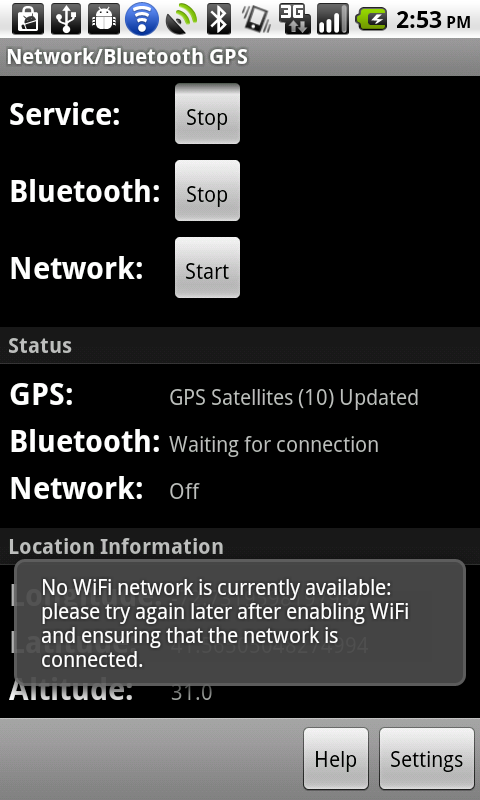
A connection can then be made to this network service from any other device on the same WIFI network. If no WIFI network is available then an error message will be shown as in Figure 17 below.
By default the service will run on demand and will stop when the main application is no longer in the foreground. To enable the service to run in the background select the Keep service active in background option, as shown in Figure 18 below. If the service is running when this setting is changed the service will be stopped and restarted.

Network clients can be seen by opening the menu option as shown in Figure 20 below.
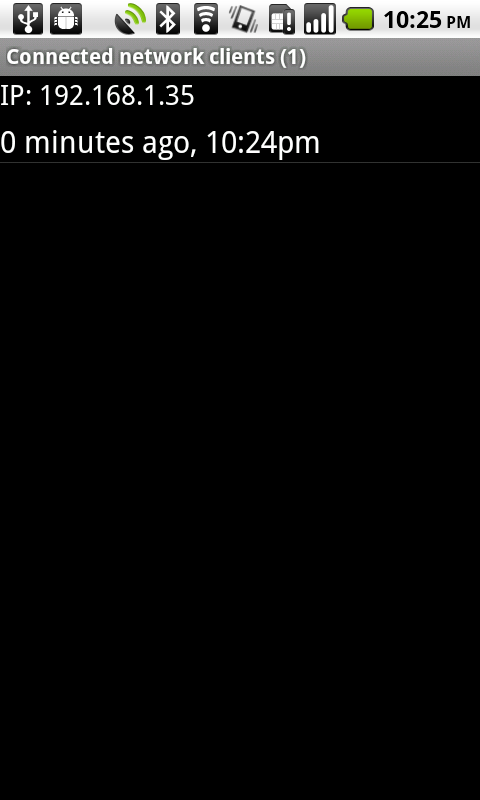
Once the client list is open it will show the connected clients as in Figure 21 below. Each client entry will have the IP address and the duration it has been connected for.
Long pressing on an entry will popup a menu providing a option as shown in Figure 22 below.
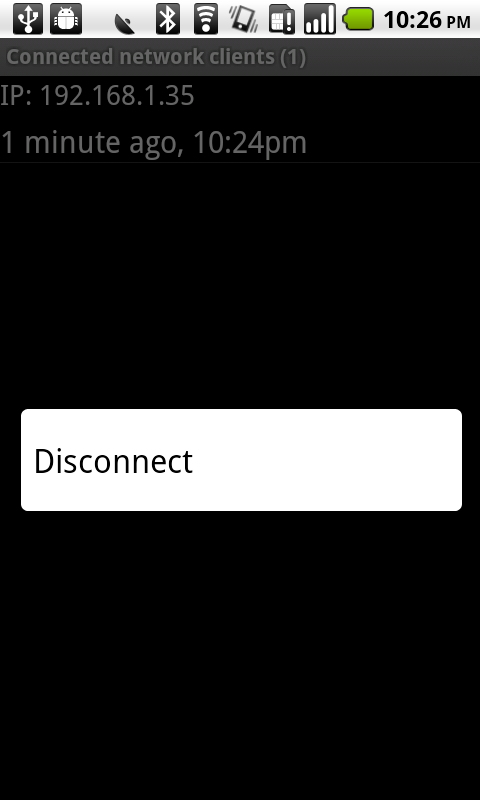
Tapping the will show a confirmation prompt: if confirmed the connection to the client will be closed.
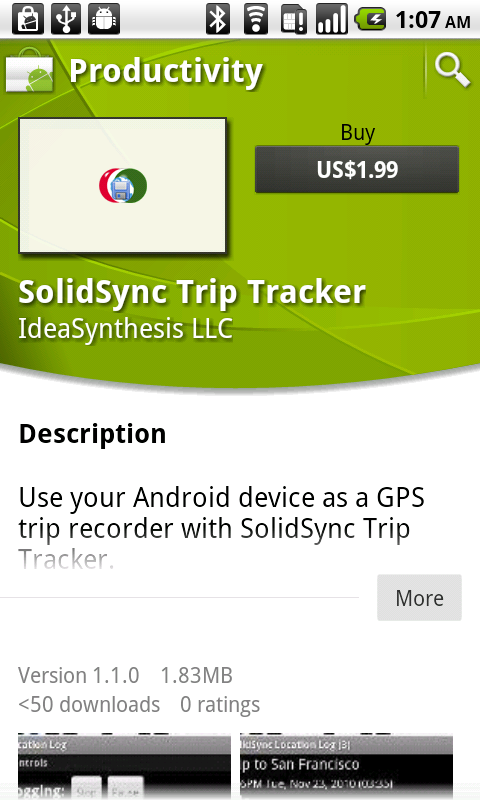
If SolidSync Trip Tracker is not installed then the Android Market application will be opened to the SolidSync Trip Tracker entry as shown in Figure 24 below.
If SolidSync Trip Tracker is installed, then a listing will be shown as in Figure 25 below. The listing will only show trips with NMEA data saved (for more information, see the Trip Tracker help file).
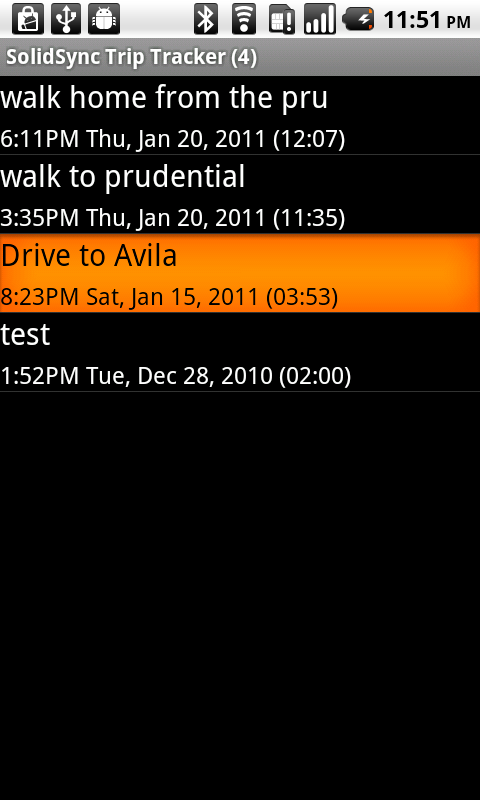
Tap on any specific trip to select it. SolidSync Trip Tracker will return to Network/Bluetooth GPS with the selected trip loaded as shown in Figure 26 below.
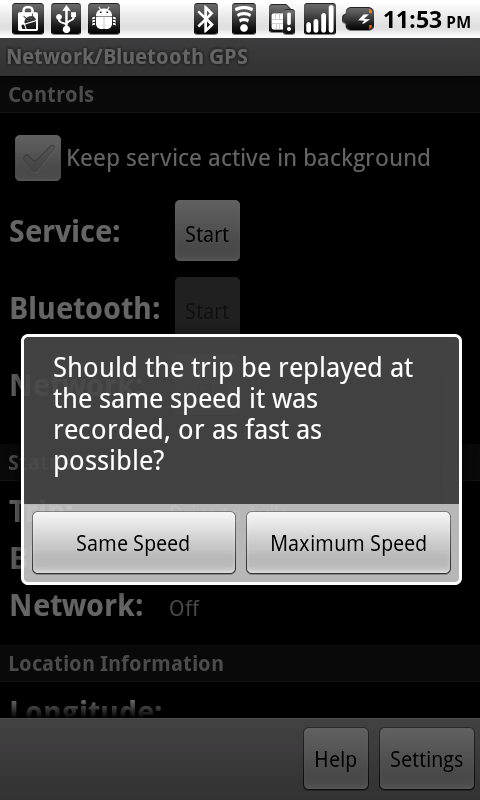
Tap the Start button to start the replay. You will be prompted to select the desired replay speed as shown in Figure 27 below. If you choose , then the replay will occur at the same speed as the original capture (for example, if the trip was captured over 2 hours, then the replay will take 2 hours). If you choose , then the replay will occur at the highest rate possible (at a rate of greater than 1 NMEA event every second).
The replay will not start until the first connection is made (either a Bluetooth connection or a network connection).
Once the replay is stopped, you will be prompted the next time you start the GPS service if you want to use the last selected trip as shown in Figure 28 below.
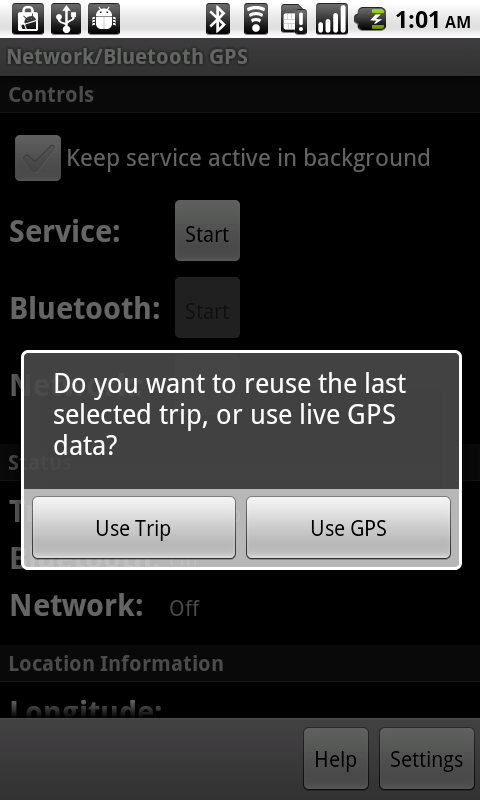
If you choose , then the GPS sensor will be used. Otherwise the last trip will be replayed again.
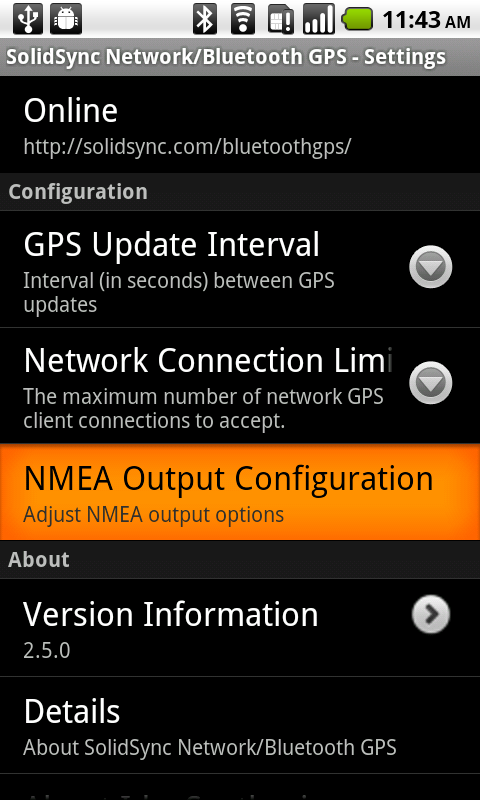
Options are available (you may have to scroll down) to review information about the software, terms of service and the privacy and content policies. You can adjust the GPS update interval and configure the number of network clients to accept. After making changes to these settings you will need to stop and restart the GPS service.
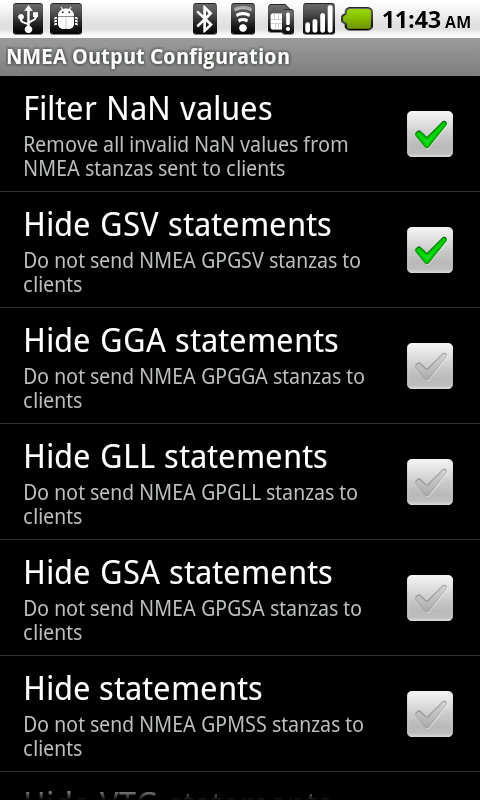
You can control the generated NMEA output using the NMEA Output Configuration options. Tapping this item will open up the NMEA output configuration screen as shown in Figure 30 below. From here you can enable/disable specific NMEA messages and apply additional filtering to the output to remove values from messages you may not want to be transmitted.

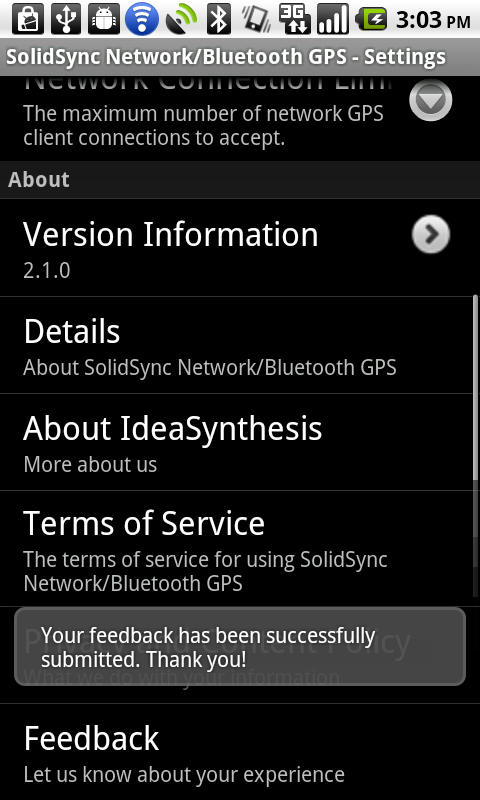
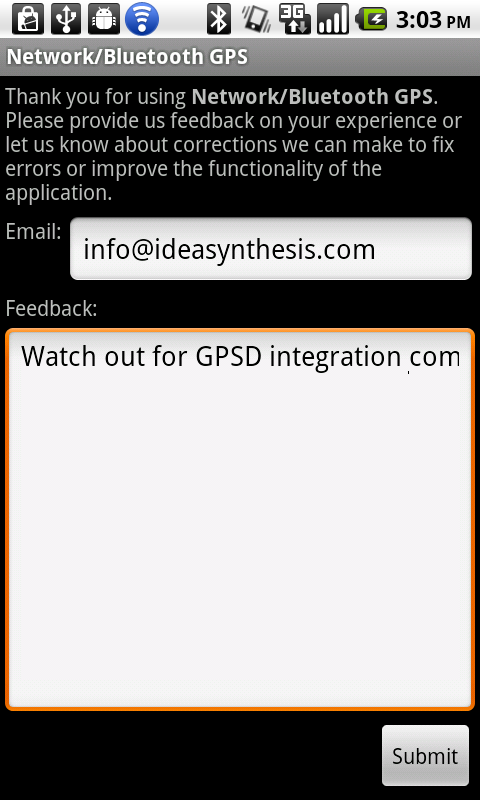
Enter an email address (this is required, so we can get back to you about your requested change) and your comments and press the Submit button as shown in Figure 32 below to send it.
Your submission will be confirmed as shown in Figure 33 below, and that’s it. Thank you!